Prusa MMU2S Reliability Modifications
2/10/2020
PURPOSE
The purpose of the below is to document what I did to get my Prusa MMU2S working extremely well on a Prusa MK3S. At this point I have lost count of how many hours of flawless prints, but it’s now in the many hundreds. The longest print thus far has been 3 minions using all 5 colors with a print time of 63 hours, 21 minutes and almost 2,000 toolhead changes (not one single intervention required).
This web page isn’t pretty, but it was easier to put all this here instead of in a Facebook post (which is what prompted this). Things I plan to do to this document when I get time:
· Add pictures of the MMU2S and notate where the mods are in case my descriptions suck.
· Finish filling in and providing gcode to the notes under “OTHER TWEAKS”.
FIRST THINGS
First thing is I followed to a tee everything in the manual when building the MMU2S, including reading all the comments in the online manual along the way, doing all the calibration of FINDA, etc.; double- and triple-checked it all.
Two things to note about the initial load of the filament:
· Make sure there are NO NICKS at all – read that again – NO NICKS – if there are any nicks in the filament (like from grinding), when that nick reaches the gear feeding the filament it will start to slip and stop the whole process.
· Cut the tip at a 45 degree angle. Prior to having an extruder-created-tip, you want a good angle to reduce the odds of the filament getting hung up on some edge as it travels to and into the extruder.
Also keep the pathway where the filament drive gears are at, blown out (compressed air) – you don’t want anything at all in the way that could cause the gears to not grip and slip. Your tension on the part that pushes the idler against the filament also should just be set per the manual – do not make it too tight.
HARDWARE
MODIFICATIONS
The goal of most of these modifications is to give a little bit wider and much smoother pathway for the filament to travel; in other words, less places for a bad tip to catch on.
Any place below where I talk about 3mm ID (4mm OD) PTFE tubing, this is what I used: https://www.amazon.com/gp/product/B07B8CT1YH/ref=ppx_yo_dt_b_search_asin_title?ie=UTF8&psc=1
Replaced the following PTFE tubes with 3mm ID (4mm OD)
tubing:
· Tube from selector to extruder (I made sure to keep it the same exact length)
o Note I did NOT replace the short tube IN the extruder (I think there is one in there) – the tube in the extruder was the only one I did not need to replace and mostly because I was too lazy to take it apart, but it’s rock solid as-is (for me at least).
· The (5) tubes under the selector (i.e., in the Front-PTFE-holder) that the filament feeds through right before reaching the selector.
o When cutting these, make sure the ends are cut straight and awl each end out a little bit (like with a round file) to make sure they are free of burrs or any obstruction.
o Make them the same length as the original ones are.
Replaced the Selector with this one:
· https://www.thingiverse.com/thing:3528314
· Notes:
o Used the “E2” version.
o Did not bother with putting the magnet in; I was more so after the better pathway this selector has.
o The “window” to see the steel ball and filament is sort of neat and allows you to blow out any crap that gets in there easily, however, I have had two instances during the initial filament load where it curled and came out the “window”. Maybe if I put the magnet in to hold the ball down this wouldn’t have happened. Again, this only happened twice (and I now have hundreds of hours of printing on it) and only upon initial load of the filament.
o Did not put the cutting blade in (but DID still put the cutting blade-holder on). The cutting blade is worthless once you get good tips (actually it’s worthless even if you don’t have good tips, IMO).
§ Originally I did put the blade in, but it kept catching on something then I managed to cut my finger in an angry-moment trying to figure out what was catching, then it dawned on me, f-it … don’t need it. :-)
Replaced the Rear-PTFE-Holder with this one:
· http://www.thingiverse.com/thing:3233579
· Notes:
o This holder does NOT have any PTFE tubes in it like the stock one, but rather you use push connectors to attach the PTFE tubes too it.
o These are the push connectors I used (and that are recommended in the thingiverse.com post): https://www.amazon.com/gp/product/B01IB81IHG/ref=oh_aui_detailpage_o00_s00?ie=UTF8&psc=1&tag=tv-auto-20
Ditched the Buffer
· Notes:
o I have to admit I never used the buffer – it looked like a stupid device to me that could be fraught with issues, including dramatically increasing drag) so I never installed it. Maybe I was wrong, dunno, but my setup works near-flawless as I have it now.
Custom PTFE tube stabilizer/tensioner
· https://www.hcd.net/prusa-mmu2s/Rear-PTFE-Stabilizer.zip
· Notes:
o Stabilizes the tubes by keeping them evenly separated and snug.
o Because the tubes in the pathway are now all wider the filament sits “looser” (is that a word??) in the tubes and the filament sometimes had a tendency to fall out of the tubes when it was retracted (and especially if using an auto-rewind spooler since that yanks a little), so I designed this piece with a radius that allows just enough tension to prevent the filament from falling out, yet still does not impede smooth movement.
o The “pigtails” slide all the way into this stabilizer/tensioner. I orient this so the holes you put the filament in are pointing up – in other words, the side that has “MMU2S” printed on it should be on the left side of the printer (left if you are facing the printer). Here is what it looks like installed:
o I did not measure the tube lengths, but I made them long enough to slide all the way into the stabilizer/tensioner and then about 20mm of extra for a gap between it and the compression connectors.
o The STL is not oriented right for printing – print on its side with the part that says “MMU2S” up (no supports should be needed). I used 0.2mm layers.
o The tubes slip in the end that says “MMU2S” (the other end has a lip to keep them from coming out so don’t try to insert from that end).
o When inserting the tubes be gentle so as to not crinkle them, especially since the sidewalls of the 3mm ID tubing are thin/weak.
o I created this in Fusion 360.
SOFTWARE MODIFICATIONS
PLA Filament Temperature
· When you look at the default temperatures under “Filament Settings à Filament à Temperature” you will notice that for the MMU2S printer profile the “Other layers” temperature is set to less than if you look at the same profile for non-MMU2S printers. Supposedly this helped make better tips – hogwash.
· I changed the temperatures back to what they are for non-MMU2S printers and they work just fine if using these mods.
· I did not want the temperatures to be different because obviously they are set that way on the non-MMU2S printers for reason (i.e., better prints).
Toolchange parameters
· Under “Filament Settings >> Advanced >> Toolchange parameters with single extruder MM printers”, used the following settings for Prusament PLA (has also worked with just Prusa PLA and Polymaker PolyLite and PolyMax PLA).

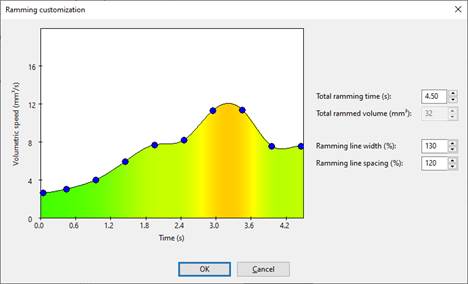
· Under “Filament Settings >> Advanced >> Toolchange parameters with single extruder MM printers >> Ramming Settings [button]”, I used the following.
· Notes:
o I can NOT take credit for these. I found these in some forum many months ago and unfortunately I did not notate where/who so I can’t give proper credit, but it wasn’t me.
o I will note though there are times where by accident I forgot to use the filament setting noted above and just used the default ones AND those still worked too – so it could be that with all the other mods, that this is not really needed, but I am using it anyway as before I did hardware mods I was using these with increased success.
OTHER TWEAKS
Unrelated to the MMU2S specifically, also adjusted the startup gcode to have the following “features”.
· PINDA temperature – my understanding from what I’ve read (and through vetting what I read) is that you get the best bed level with the PINDA at 35C. So, the startup gcode gets the PINDA to 35C before it does the bed leveling. If the PINDA is already >35C it cools it down to that and if <35C heats it up to that. This is done by pre-heating the bed to 75C (regardless of filament type since the bed temp will switch to what is called for the specific filament after leveling) and lowering Z to 0.1mm from the bed (to heat; for cooling it raises it high).
· No more pooplets during bed leveling -- prior to leveling, the nozzle is preheated to 175C (regardless of filament type) so that’s enough to get it soft and close to whatever temp will be called for, but not enough for oozing, so when the bed leveling occurs, the majority of the time (99%+), it levels and does not leave a trail of droplets.
· After bed leveling is done the nozzle and bed all heat to whatever is called for the specific filament then goes about its business printing.
· To use this gcode, in PrusaSlicer, go to “Printer Settings”, select the printer you want to update, then go to “Custom G-code” and delete everything in “Start G-code” and then replace it with the g-code supplied here for the relevant printer. Then save it, renaming it to something meaningful to you.
· The g-code:
o https://www.hcd.net/prusa-mmu2s/MK3S-Start-G-code.txt
o https://www.hcd.net/prusa-mmu2s/MK3S-MMU2S-Start-G-code.txt
o https://www.hcd.net/prusa-mmu2s/MK3S-MMU2S-Single-Start-G-code.txt
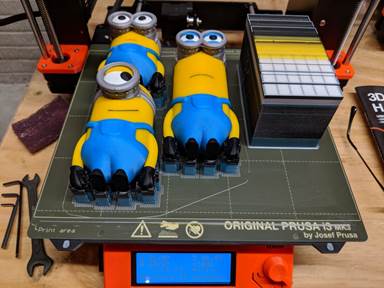
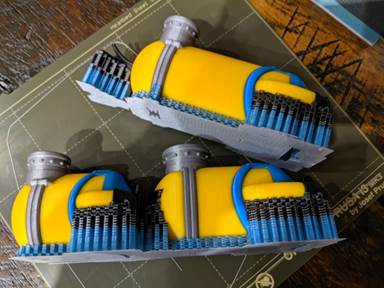
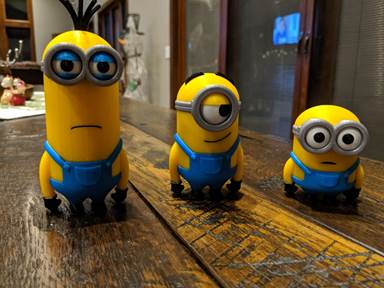
THE MINIONS
Here are pics of the 63 hours, 21 minute, almost 2,000 toolhead changes Minions print (supports on build plate only, 0.2mm layers).
The models:
·
https://www.thingiverse.com/thing:2688284
·
https://www.thingiverse.com/thing:2688280
·
https://www.thingiverse.com/thing:2688275
The final output: